Showing posts with label Springtime. Show all posts
Friday, January 31, 2020

Hello Bluebird | Thinking of You


Hello dear friends!

Welcome to my front porch where we talk about anything that our hearts fancy!  Today I'm thinking of you and all the encouragement and smiles you send my way here on my blog, Instagram and Facebook.  I want to make sure you know how much I appreciate your visits and love to talk with you.  If you leave a comment, please remember to check the "notification button" on an individual post if you would like to talk about something or ask a question.

Is it to early to share a sweet clean and simple springtime card?  No never! I have several friends who have been on my mind recently.  I've known them for years and they are as much family as they are friends.  This year I'm going to make sure I let them know how much they mean to me with lot's of love tucked inside a handmade card.  I don't know about you, but to many times my cards don't get mailed -- time to remedy that!


Stamp sets and dies used:

How did I create this card:
  • Cut and score a top fold A2 (4.25 x 5.5) piece of Neenah Classic Crest Solar White 110 lb. card stock 
  • Cut a second piece of Neenah Classic Crest Solar White 110 lb. 3.75 x 5.25 and round two of the corners (your choice which corners)
  • Stamp the Elephant, three butterflies, and watering can on 80 lb Neenah Classic Crest Solar White card stock with Brutus Monroe (Raven) Detailed Permanent Ink that is alcohol marker safe and waterproof when dry.
  • Color with Copic markers, or your own choice of medium - just remember to pair your medium with the correct paper.  My copic colors are as follows:
    • Elephant = C00, C0, C2 and R00, R01 for inside ears and toenails
    • Watering Can = C00, C0, C2; R01; BV000
    • Butterflies = Y06, Y08; R21, R22; BV000, BV01
  • All florals from the Wildflower Bouquet set are stamped with the Papertrey Ink premium dye inks:
    • Cocoa Bean, Harvest Gold, Pale Peony, Lilac Grace, Green Parakeet, and New Leaf
  • Small oval from the Stand Alone set, Stitched Tag Builder, was cut from Neenah Classic Crest Solar White 80 lb. and slightly inked with the Harvest Gold premium ink.
  • Adhere the small oval with liquid adhesive.
  • Begin placing your elements where you'd like them remembering the little elephant will be popped up with 3M dimensional adhesives last.  I actually adhered the watering can underneath the baby elephant's trunk first and put my 3M adhesives on but didn't take the tacky backing off until I knew exactly where I would place her.
  • Little details - remember last time we talked about little details?  Here we go!
    • Three little butterflies in colors that repeat in the florals
    • And three tiny water droplets in flat jewels from Little Yellow Bicycle or your choice.
    • Gold leaf pen trim around the image panel. 
The gold leaf pen is something I do often when creating a CAS design.  It just gives it that extra something special and I attribute it to my sweet online friend Katie Sims

Thinking of You Close Up
A simple way to tell your friends and family, "I'm thinking of You!"


And now dear friends I must tell you that I'm flying the nest.  This will be my last card for Hello Bluebird Stamps as a design team member.  I will continue to create cards with their delightful illustrations and post them here and on my other galleries, but it's time to slow down and enjoy this new decade and season of life.   I hope you'll continue to visit me here, on Instagram and Facebook as I continue to create and share my art.   As I go forth I want you to know there will always be a little bluebird on my shoulder!

With sincere love and hugs,
Susie ~
Saturday, January 25, 2020

Hello Bluebird | Bluebird on my Shoulder


Hello dear friends,

Welcome to a cold and windy visit on my front porch!  A friend said the weather in Charleston is like picking power ball numbers - 56, 31, 27, 65, 19, 70!   Maybe I should purchase a ticket (she laughs).   How about you, how's your weather?   Our poor little cyclamen plants had to be brought in from the screened porch to weather out the next few days of cold.   But no matter the weather, rain or shine, I've got a bluebird on my shoulder!   And that my dear friends is the title of my newest card.

I'm sharing a mid-January card using several Hello Bluebird Stamp sets and transitioning these older sets to create new scene for Valentine's Day.  So let's get our beverage and start talking crafty talk shall we?


How did I create this card:
  • Cut a 4.25 x 5.5 card base (top fold) from Neenah Solar White Classic Crest card stock 110 lb
  • Cut a panel 3.75 x 5.25 from Neenah Solar White Classic Crest card stock 80 lb 
  • Ink blend the 3.75 x 5.25 panel with Ranger Distress Oxide Spun Sugar and Wilted Violet and spritz with water.  Stamp your sentiment and set aside to dry.   I used Brutus Monroe Detail Ink (Raven) as my ink choice.
  • Stamp your images and color with your choice of medium, then die-cut with the available coordinating dies.  I used the following stamp sets:
  • I colored my images with Copics so I chose to use Memento (Tuxedo Black) as my stamping ink.
  • With my panel now dry, I arranged my colored images.  I used the stamped sentiment to ground my larger elements.  The little girl is popped up with 3M tape as are the clouds and sunshine  The puppy and duck are adhered with Nuvo by Tonic Deluxe Adhesive 
  • Instead of raindrops I've added rays of sunshine hearts in yellow "sunshine" by PaperSource
  • Little details are subtle:
    • The bluebird on the shoulder 
    • Tiny heart on the puppy's collar
    • Valentine heart in the little girl's hand.
Don't forget those little details for in my humble opinion they take a design to the next level.   A simple card such as this now keeps the viewers eye longer and brings a sigh of delight (I hope) *laughing*   Background colors also play a big part too.  I tried several different colors and mediums before settling on the purple/pink combo (remember your color wheel).


It's my hope to have a dialogue with crafters here on my front porch; so thank you as always for visiting and leaving such lovely comments.  I hope you've enjoyed this sunny little valentine.


The sun will be out tomorrow, but in the meantime let's create something that makes that little bluebird on our shoulder sing!  Until next time.

Very sincerely,
Susie ~
Thursday, March 21, 2019

Hello Spring, Let's Celebrate!

Hello Bluebird
Banner Buddies

Hello friends!   I have the sweetest card to share with you today.  For the past year I have been looking at the stamp and die sets being released from Hello Bluebird.   The illustrations are absolutely adorable!   With each release I found myself getting closer to a purchase.  But I never expected to fall so hard that I would purchase almost an entire release!  Yep, that's exactly what I did.   
This week I had some time to play with several of my new sets and thought you might like to see the results.


The first thing I did was stamp all the wonderful woodland critters from the new Banner Buddies stamp set, and the Springtime stamp set.  Oh man do I love that frog!!  Both of these sets have so many cute images to create with.  What a wonderful morning of coloring using my Copic markers!   After I got all my images colored I started arranging them in little scenes.   

The warmth of yellow card stock from Papertrey Ink Lemon Tart was perfect to use for the first day of spring.  Before layering the scalloped border,  I sponged some Scattered Straw Distress Ink on the card base, fading it into the center where I stamped my sentiment from, Spring Script Stamp, and Typed Everyday Stamp   

I cut another piece of yellow card stock using the Gallery Frame #2 Die which is a stand alone die and adhered it to my card base with some mounting adhesives to pop it up and create a shadow box effect.

Tip:  Take a photo of your layout before you begin to place your images on card stock, especially when you have multiple elements.   The close up below allows you to see the dimension this card has.  It is still light weight and I believe will travel through the mail just fine, but always err on the side of two stamps rather than one just to be on the safe side.


A little shine, a few sequins, and a touch of white pen and it's finished.   These stamp sets are so cute they carry the day - all you need to do is color and bring them to life with a little imagination!

What did you do to celebrate the first day of Spring? 
Thank you as alway for your visit.   Come back.  Sit a while.  I think we're going to be friends!

Saturday, March 12, 2016

Easter Prayers

Hello Friends!

I'm still playing with the wonderful sewing dies from Simon Says Stamp, and looking through my die collection for inspiration.  I just love embellishing these sweet felties.   This adorable Memory Box Plush Easter Egg is a pocket die!  Can you imagine all the little surprises you can tuck inside for that special someone?!

MFTstamps has some wonderful springtime 6x6 designer plaid paper packs that makes pairing your newest springtime stamp sets a breeze.   I had a card base with a panel and scalloped frame already finished, and used the color palette for my little felted egg.

The fun of designing with these dies is embellishing them.  I used some of my rolled Die-namics flower and roses dies.  I love the Flower and Leaves category - so many great choices!   And don't forget the bling!  Sew some seed pearls, or if you like, use some half pearls, tiny rhinestones, sequins. It's all in the eye of the beholder (she smiles).   Because I wanted to give some encouragement to the recipient,  I used a word die, Prayers, from Hero Arts created exclusively for Simon Says Stamp.

 A close up of the upper right and lower left show the details of those sweet felted flowers and rose buds.
I hope you'll find time this spring to create a keepsake for someone.  Whether you choose to tuck in a gift card, a coffee/tea card, or a little encouragement, the added element of felt to your card is sure to bring a smile.   My prayers are with you this Easter and always.

Sincerely,
Susie ~

Friday, March 11, 2016

Peter Cottontail and Flopsy

Spring is here!  Spring is here!
Winter is gone, and two flowers appear.
Three little robins begin to sing.
Four bicycle bells begin to ring.
Five children come out to jump the rope.
Spring is here now!  I hope, I hope!
                                   ~ Author Unknown

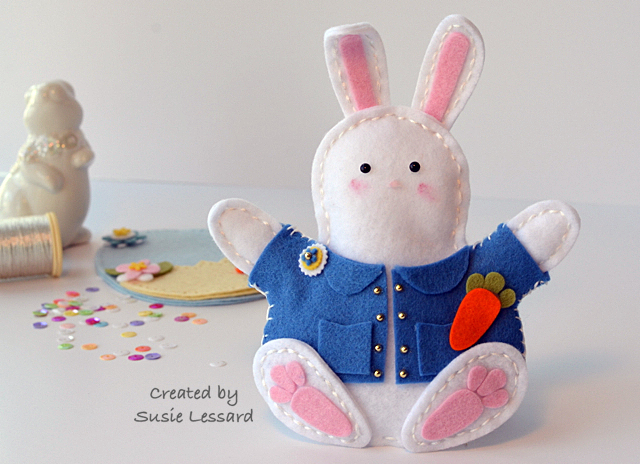
Hello and welcome to my new blog, Sincerely Susie, formerly Summerwalk Designs.   I'd like to introduce you to a very special couple.   Peter Cottontail and Flopsy- they are both good little bunnies
(she smiles).

I was so inspired by the Simon Says Stamp release, Spring Plush, showing die cuts to create little felted bunnies, sunshine, clouds, baskets, chicks, hearts and more!  Oh the sweet offerings from heart and hand that can be crafted using these wonderful dies.
My first bunny, Flopsy, was created by using the Liam Bunny die from Memory Box sold through Simon Says Stamp.  Instead of holding a carrot she has a May basket of flowers, little pearls, and baby heart buttons.  And what little bunny would be caught without a flower in her hair? - err, fur.   Creating with felt is another fun way of stretching your die collection.

Once I had created Flopsy I knew I needed a pair.   Here comes Peter Cottontail hopping down the trail!
To create Peter's coat I used the Liam Bunny die again, this time using blue felt from Taylored Expression, and cut twice.   I tailored the coat to fit, and finished with a blanket stitch and little gold flat pearls for buttons.  I added a little flower boutonniere, and a cute little carrot -- it's made from cutting the foot pads twice; once in orange and then in green.   The pockets on his jacket are from the newest MFTstamps blueprint 27 die.   It's amazing what you can find when you actually start looking (she smiles).
Close up of Peter Cottontail
I hope these little felties have inspired you to create something that makes your heart sing!

Sincerely,
Susie ~


Custom Post Signature

Custom Post  Signature