Showing posts with label Valentine's Day. Show all posts
Saturday, January 25, 2020

Hello Bluebird | Bluebird on my Shoulder


Hello dear friends,

Welcome to a cold and windy visit on my front porch!  A friend said the weather in Charleston is like picking power ball numbers - 56, 31, 27, 65, 19, 70!   Maybe I should purchase a ticket (she laughs).   How about you, how's your weather?   Our poor little cyclamen plants had to be brought in from the screened porch to weather out the next few days of cold.   But no matter the weather, rain or shine, I've got a bluebird on my shoulder!   And that my dear friends is the title of my newest card.

I'm sharing a mid-January card using several Hello Bluebird Stamp sets and transitioning these older sets to create new scene for Valentine's Day.  So let's get our beverage and start talking crafty talk shall we?


How did I create this card:
  • Cut a 4.25 x 5.5 card base (top fold) from Neenah Solar White Classic Crest card stock 110 lb
  • Cut a panel 3.75 x 5.25 from Neenah Solar White Classic Crest card stock 80 lb 
  • Ink blend the 3.75 x 5.25 panel with Ranger Distress Oxide Spun Sugar and Wilted Violet and spritz with water.  Stamp your sentiment and set aside to dry.   I used Brutus Monroe Detail Ink (Raven) as my ink choice.
  • Stamp your images and color with your choice of medium, then die-cut with the available coordinating dies.  I used the following stamp sets:
  • I colored my images with Copics so I chose to use Memento (Tuxedo Black) as my stamping ink.
  • With my panel now dry, I arranged my colored images.  I used the stamped sentiment to ground my larger elements.  The little girl is popped up with 3M tape as are the clouds and sunshine  The puppy and duck are adhered with Nuvo by Tonic Deluxe Adhesive 
  • Instead of raindrops I've added rays of sunshine hearts in yellow "sunshine" by PaperSource
  • Little details are subtle:
    • The bluebird on the shoulder 
    • Tiny heart on the puppy's collar
    • Valentine heart in the little girl's hand.
Don't forget those little details for in my humble opinion they take a design to the next level.   A simple card such as this now keeps the viewers eye longer and brings a sigh of delight (I hope) *laughing*   Background colors also play a big part too.  I tried several different colors and mediums before settling on the purple/pink combo (remember your color wheel).


It's my hope to have a dialogue with crafters here on my front porch; so thank you as always for visiting and leaving such lovely comments.  I hope you've enjoyed this sunny little valentine.


The sun will be out tomorrow, but in the meantime let's create something that makes that little bluebird on our shoulder sing!  Until next time.

Very sincerely,
Susie ~
Friday, January 10, 2020

Hello Bluebird | Transitioning Stamp sets + Valentine Party

Hello friends,

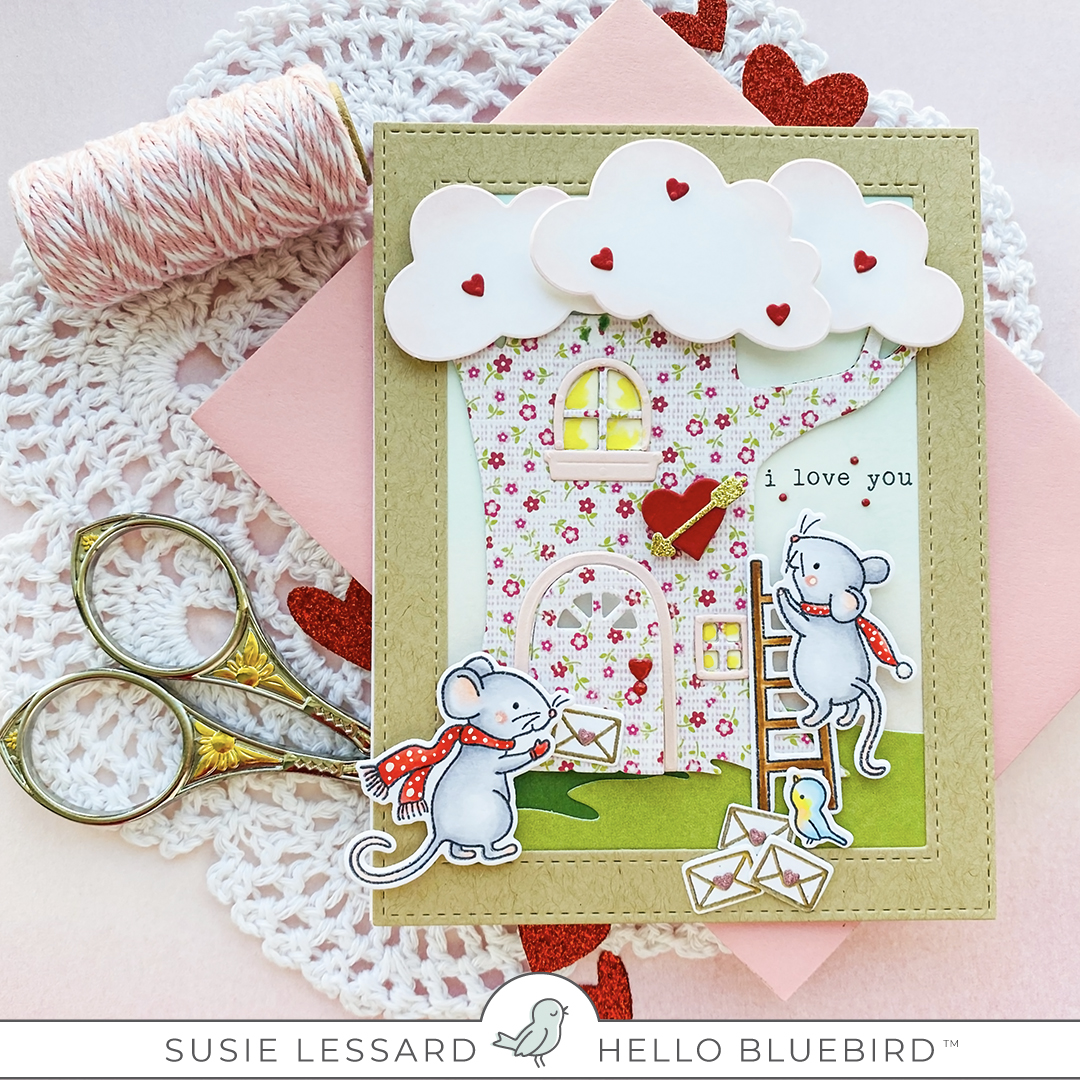
Happy New Year and welcome to my front porch!   Just a short visit today to share a sweet little Valentine card with you created with some previous released Hello Bluebird Stamp sets.   Using your stamp sets this way is a nice way to continue stamping right after Christmas without straining our budgets.   We usually have our Christmas color palettes still on our desks and with just a few tweaks we can start creating Valentine's Day cards (my favorite).   A friend and fellow designer told me the other day that Valentine cards are her favorite to create (don't tell Christmas!) isn't that cute?  It certainly brought a smile to my face.

I started by jotting down some ideas in my notebook and creating a faux mock-up of the card.   It's a two-fold process for me;

  •  1.  Gets the creative juices flowing and,
  •  2. Allows me to move elements around, and brings the design visually from head to paper which helps my creative process.  


For my card I've used the Hello Bluebird stamp and die set(s) listed below.  All images were colored with Copic markers and patterned paper from my stash.


Transforming the Treehouse Scene and Merry Mice from Christmas to Valentine's Day was simple.  By choosing elements like the dainty pink/red flowered patterned paper, red heart with sparkly arrow, a heart shaped door knob, clouds dotted with hearts for foliage, and valentine letters sealed with sweet pink hearts change the landscape from Christmas to Valentine's Day.   Just add your creativity and imagination.


You're invited to a Valentine Party!

One element I always try to include in my design(s) is the sweet Hello Bluebird icon.  I think it's so lovely and it just melts my heart each and every time I look for that special spot.

I hope you've enjoyed this look at transitioning stamp sets and will give it a try in 2020!

Sincerely,
Susie ~
Tuesday, December 17, 2019

Hello Bluebird | Thinking of You with Love...

"I wrote in a song that in the long, long trip of growing, there are stops along the way...
~ Mister Rogers

Hello Bluebird Friends!

Christmas is only eight days away - to a child it must seem like a long, long trip of "are we there yet?"   Today I'm taking a look back through my own childhood stops along the way.

I love red, I do!   And I love Christmas with all that it brings.  But I am especially fond of Valentine's Day.  Valentine baskets, mailboxes, cards to create and color, cookies to bake and decorate -- February colored in pink and red; adorned in chocolate and lace!   Oh I'm in love with love itself!

And, with each and every Valentine card I create I wander down memory lane to second grade.  I drop a card into each doily trimmed basket and look forward to the party about to take place.  Sweets shaped like hearts and little candies that say, "Will you be my Valentine!"  YES!

So today I've created a Valentine's Day card for YOU using the stamps sets and the available companion dies:
I've also used the Stand Alone Die set, Gallery Frame #1 cut from red card stock.


How did I create this card?

I cut an A2 card base (top fold) in 110 lb Neenah Solar White card stock and set it aside.  Then I began stamping the images from the stamp sets listed above in Memento Ink (Tuxedo Black) and set them aside.  I also cut 2 white card stock panels (3.75 x 5.0 inches).   I die cut a heart from one, and ink blended the other with Distress Ink, Spun Sugar and a little Victorian Velvet.  Then I married the two with some adhesive, let it dry, and stamped my sentiment from the Banner Blessings set in VersaFine Ink (Black).  Sometimes I will do a "ghost" mock up that helps me with placement.  I die-cut the companion dies without stamping on them and move them around until I like the placement.

Satisfied with placement, I continue on.   I played with the idea of leaving the heart die-cut panel white, but decide to see what a contrasting color pattern might look like.  Hmm, I like that!


Now the fun begins - coloring!   All stamp images are colored with Copic markers.
  • Mouse = C00, C1;
  • Mailbox and Scarf = R22,24, and 27; E31, 32, 34
  • Bluebird = B00, B01; R00, R01
  • Flowers = B00, 01, 34, 64; R22, 24, 27; Y08
  • Leaves: BG 70, 72, G03
  • White Gel Pen
With all the images colored, I adhered them in place.  The only images raised with 3M adhesive tape are the mouse and bluebird.   I cut a slit in the mailbox opening and tucked one of the envelopes inside and that gives it a little height - enough that I can tuck an extra letter underneath.   The third letter is held by the little mouse.  I like to keep little negatives from dies, i.e., dots, hearts, etc.   They come in so handy for additional ephemera to put on your card.   For this card, thoughts of love using negative dots and hearts drift upward as the little bluebird gazes at the sentiment - Thinking of You with Love!

I hope you've enjoyed my card today.   Wishes for the Merriest of Christmases and a Happy New Year!  Be sure to visit the Hello Bluebird IG and Facebook galleries for new cards and inspiration from the design team.   Until next time ~

Sincerely yours,
Susie ~

Monday, January 28, 2019

Vintage Valentine | Bits & Bops

Hi friends!

As promised this will be my last Valentine's Day card for 2019.   Ooh that was difficult to say!  But if I'm going to get these cards out in time, I have to bring this theme to a close (she smiles).

I think we are all feeling the deep freeze to some degree (no pun intended) and it's no exception here in Charleston.  So on Sunday afternoon I decided to get cozy and craft!   I love, love, love 50's vintage Valentine's Day cards, do you?   And when I find vintage looking designer paper that I can cut apart - I do!   I also keep little file boxes of left over die cuts, ephemera, and little bits and bops!  It's so much fun to open these boxes of treasures and search around for something that strikes my fancy - do you do that?

Piling up affection for you, Valentine!


The boxes hold die cut frames, ovals, circles, rectangles, stripes, you name it...   I had enough goodies in the Valentine box I was able to create a card without a lot of fuss - something that sounded good on Sunday afternoon.   My focal point is a little girl building a sand castle on the beach - very vintage 50's looking.  I found a frame cut from designer paper with the words Love written across it - check!  I did cut the base frame from the Penny Black Stamps, Lovely Border #51-484 die in red card stock.  I also used Shades #51-055 to die cut a tag that I placed behind the frame.  All were placed on the Lovely Border frame.   I few sparkly hearts cut using, Rose for You, from Simon Says Stamp and I was done!   Did you notice the pretty "Love" postage stamp?  It's a nice finish if you have stamps to coordinate with your cards.  It's all in the presentation!

Are you piling up affection for anyone this Valentine's Day?
Try this easy peasy way of creating your next card!

Thank you as always for your sweet visits.

Sincerely,
Susie ~
Sunday, January 27, 2019

Valentine's Day |LOVE U | Die Cutting

Hi friends!

I'm sharing another card today using those sweet blooms, Desert Bouquet, Mini Modern Blooms, K-01 Beautiful Blooms (I'm sorry I think these sets may have been discontinued), from MFTstamps.   Any small flower sets you may have will work.  I also used one of my favorite heart dies, Sketched Hearts, from Simon Says Stamp.  This is such a great die because it really is a three for one die.  Two hearts attached, plus a small heart all in one!  I cut the die twice, once from Raspberry Fizz card stock, and once from mirrored gold card stock to compliment the die cut letters, LOVE U from Papertrey Ink Block Alphabet Upper Die collection


My background panel dry embossed from Papertrey Ink Damask Designs Impression Plate provides texture, while the circle, cut from a basic nested circle die provides dimension and a place for your flower spray to sit.  The sweet sketched heart die sits perfectly at the bottom of the circle.

I have several more Valentine's Day cards for you next week.  I think that will be the last of them for this year.  Time to get them in the mail.  I hope you've enjoyed our time together.  And I'll see you back next time.   A special thank you to Michelle Leone from Papertrey Ink and all the inspiration she provided with her adorable card, Fiesta, Like There's No Manana!
Monday, December 17, 2018

Happy Heart Day Blog Hop | Penny Black


Hello Penny Black Fans!
It's a "Party with Penny!"   You're invited to join in the fun over the next several days as Penny Black reveals their newest collection of stamps and dies, Happy Heart Day!

Penny Black is kicking off the party with a Blog Hop!

You should have arrived at my blog from the talented, Penny Ward
If you want to start the hop from the beginning, you can go to the Penny Black blog for a complete list of all of the blog hop participants.   You can also find the blog hop list at the end of my blog post.

So let's get this party started!
This release is chock-a-block filled with love-themed stamps and creative dies that will make your heart sing!

Just for you Valentine!
the little blue bird seems to say.

Spaced Reserved #30-535,   Lovely Border #51-484,  Elegant Stitching #51-440

I absolutely adore the sweet little stamp offerings tucked inside Spaced Reserved #30-535.  Don't overlook these little gems when you start designing your cards.  Many times they can be used to create background scenes and even a full card design.

To frame the outside of this sweet card I used the new Lovely Border die, #51-484 and the Elegant Stitching die, #51-440 as an inside panel.  The soft grey striped patterned paper is such a nice contrast to the peachy pink.  For the third panel I stamped the small images randomly around a rectangular post-it note and colored all the images with Copic Markers and finished with a little Polychomos pencil.   Once my coloring was done I softly sponged on some distress ink.

The smallest panel was cut with the smallest of the Lovely Border dies #51-484   I used my Misti to position my sentiment and stamped with black ink.   One of the sweetest images in this set is a little blue bird (in my humble opinion).   I colored, hand trimmed, and positioned it looking upward toward the balloon.  I die cut the smallest heart from the set, Heart Balloons #51-493  and adhered it to the panel with dimensional tape.   To give some interest and carry the sentiment through I attached some very petite sliver thread to the balloon and looped it around the sentiment to the little birds mouth.   


My second card features the main character from the stamp set, Space Reserved #30-535   Penny Black is known for their adorable critter characters.  This little Teddy bear is no exception!  He's got a space reserved for his Valentine and a little gift to give as well! 

Spaced Reserved #30-535,  Lovely Border #51-484

Colored with Copic markers and finished with Polychomos pencil, this guy will steal your heart away!  He even made sure to put a little heart on his sign to entice his Valentine.  I have used the new Lovely Border #51-484 and Heart Balloons #51-493 again to show you how versatile they are.  Both of these cards could be created as "new baby" cards just by changing your color palette, sentiment, and popping up a different sign on the bench (easy peasy)   How sweet would that be?!


My third and last card for today is created with All My Love #30-534   I decided to paper-piece the word LOVE on this image so I stamped the image several times.  I colored the first one with Copic marker and finished with Polychomos pencils.  Next, I stamped the image several times on different patterned papers and trimmed out the LOVE letters (she smiles).   After adhering the letters I hand trimmed the entire colored image and placed it over three hearts die-cut from the set, Heart Balloons #51-493  I had one piece of pink Ombre paper so I positioned the balloon dies very carefully.   It is helpful if you lay out your dies and stamps when designing to make sure your orientation is the way you envision it.  I stamped the sentiment in black using my Misti and added a few flat gems to go along with the sweet rose and heart studded balloon Teddy has for his Valentine.   

He's peeking out to say
Happy Heart Day!

All My Love #30-534,  Lovely Border #51-484,  Elegant Stitching #51-440, Heart Balloons #51-493


It wouldn't be a party without a givaway; right?  Penny Black is giving away a $50 shopping spree to the Penny Black online store to THREE lucky winners.  To enter, leave a comment on any blog hop post (this one included).  The giveaway closes on Sunday, December 23rd at 11:59 PM PST and winners will be announced on the Penny Black blog on December 31st

And now... keep hopping!  Your next visit is: Marion Vagg


BLOG HOP ORDER

        Susie Lessard <---

Thank you for joining the Penny Black Blog Hop today.   All products shown are from the newest Happy Heart Day release and can purchased at the Penny Black online store.


Custom Post Signature

Custom Post  Signature