Friday, January 31, 2020

Hello Bluebird | Thinking of You


Hello dear friends!

Welcome to my front porch where we talk about anything that our hearts fancy!  Today I'm thinking of you and all the encouragement and smiles you send my way here on my blog, Instagram and Facebook.  I want to make sure you know how much I appreciate your visits and love to talk with you.  If you leave a comment, please remember to check the "notification button" on an individual post if you would like to talk about something or ask a question.

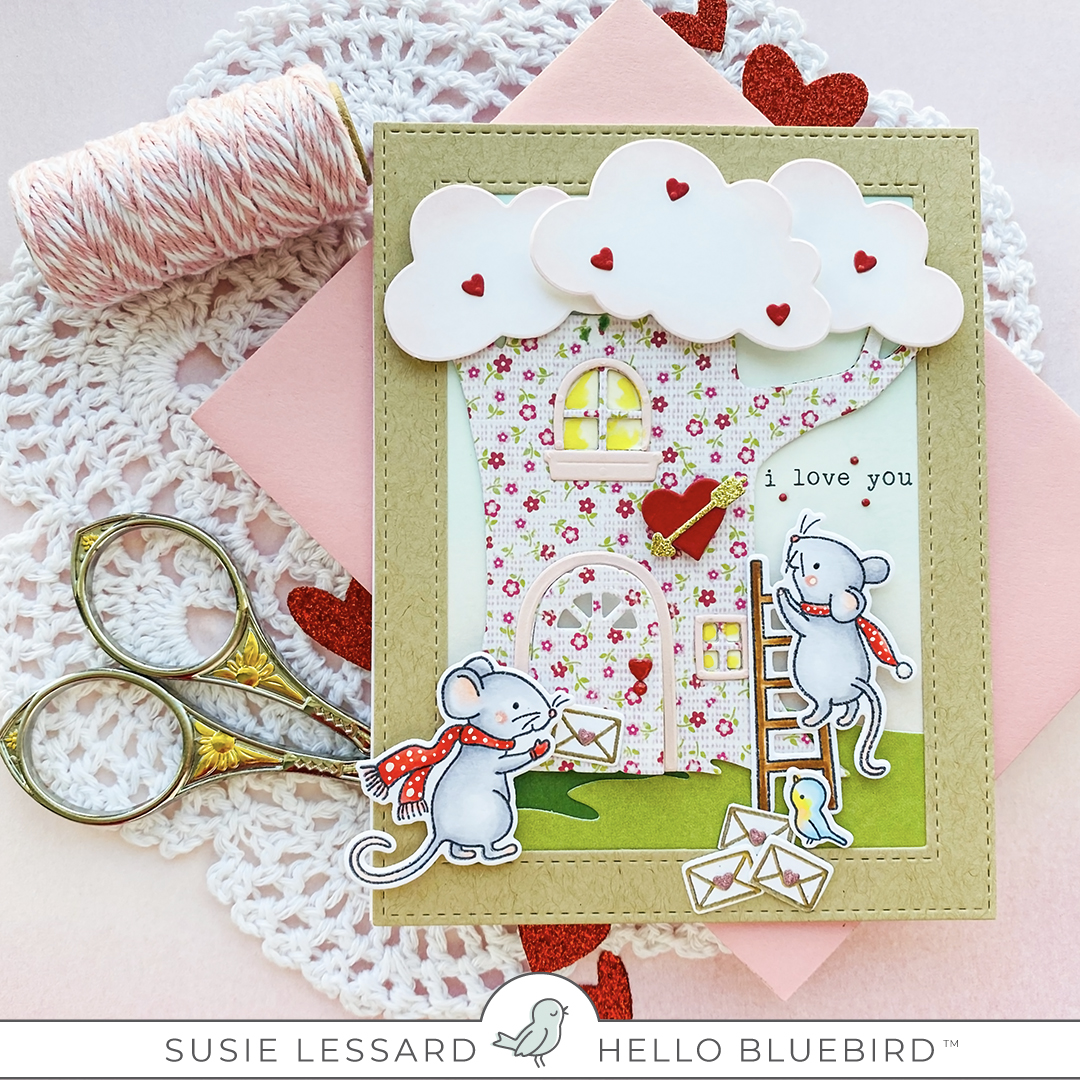
Is it to early to share a sweet clean and simple springtime card?  No never! I have several friends who have been on my mind recently.  I've known them for years and they are as much family as they are friends.  This year I'm going to make sure I let them know how much they mean to me with lot's of love tucked inside a handmade card.  I don't know about you, but to many times my cards don't get mailed -- time to remedy that!


Stamp sets and dies used:

How did I create this card:
  • Cut and score a top fold A2 (4.25 x 5.5) piece of Neenah Classic Crest Solar White 110 lb. card stock 
  • Cut a second piece of Neenah Classic Crest Solar White 110 lb. 3.75 x 5.25 and round two of the corners (your choice which corners)
  • Stamp the Elephant, three butterflies, and watering can on 80 lb Neenah Classic Crest Solar White card stock with Brutus Monroe (Raven) Detailed Permanent Ink that is alcohol marker safe and waterproof when dry.
  • Color with Copic markers, or your own choice of medium - just remember to pair your medium with the correct paper.  My copic colors are as follows:
    • Elephant = C00, C0, C2 and R00, R01 for inside ears and toenails
    • Watering Can = C00, C0, C2; R01; BV000
    • Butterflies = Y06, Y08; R21, R22; BV000, BV01
  • All florals from the Wildflower Bouquet set are stamped with the Papertrey Ink premium dye inks:
    • Cocoa Bean, Harvest Gold, Pale Peony, Lilac Grace, Green Parakeet, and New Leaf
  • Small oval from the Stand Alone set, Stitched Tag Builder, was cut from Neenah Classic Crest Solar White 80 lb. and slightly inked with the Harvest Gold premium ink.
  • Adhere the small oval with liquid adhesive.
  • Begin placing your elements where you'd like them remembering the little elephant will be popped up with 3M dimensional adhesives last.  I actually adhered the watering can underneath the baby elephant's trunk first and put my 3M adhesives on but didn't take the tacky backing off until I knew exactly where I would place her.
  • Little details - remember last time we talked about little details?  Here we go!
    • Three little butterflies in colors that repeat in the florals
    • And three tiny water droplets in flat jewels from Little Yellow Bicycle or your choice.
    • Gold leaf pen trim around the image panel. 
The gold leaf pen is something I do often when creating a CAS design.  It just gives it that extra something special and I attribute it to my sweet online friend Katie Sims

Thinking of You Close Up
A simple way to tell your friends and family, "I'm thinking of You!"


And now dear friends I must tell you that I'm flying the nest.  This will be my last card for Hello Bluebird Stamps as a design team member.  I will continue to create cards with their delightful illustrations and post them here and on my other galleries, but it's time to slow down and enjoy this new decade and season of life.   I hope you'll continue to visit me here, on Instagram and Facebook as I continue to create and share my art.   As I go forth I want you to know there will always be a little bluebird on my shoulder!

With sincere love and hugs,
Susie ~
Saturday, January 25, 2020

Hello Bluebird | Bluebird on my Shoulder


Hello dear friends,

Welcome to a cold and windy visit on my front porch!  A friend said the weather in Charleston is like picking power ball numbers - 56, 31, 27, 65, 19, 70!   Maybe I should purchase a ticket (she laughs).   How about you, how's your weather?   Our poor little cyclamen plants had to be brought in from the screened porch to weather out the next few days of cold.   But no matter the weather, rain or shine, I've got a bluebird on my shoulder!   And that my dear friends is the title of my newest card.

I'm sharing a mid-January card using several Hello Bluebird Stamp sets and transitioning these older sets to create new scene for Valentine's Day.  So let's get our beverage and start talking crafty talk shall we?


How did I create this card:
  • Cut a 4.25 x 5.5 card base (top fold) from Neenah Solar White Classic Crest card stock 110 lb
  • Cut a panel 3.75 x 5.25 from Neenah Solar White Classic Crest card stock 80 lb 
  • Ink blend the 3.75 x 5.25 panel with Ranger Distress Oxide Spun Sugar and Wilted Violet and spritz with water.  Stamp your sentiment and set aside to dry.   I used Brutus Monroe Detail Ink (Raven) as my ink choice.
  • Stamp your images and color with your choice of medium, then die-cut with the available coordinating dies.  I used the following stamp sets:
  • I colored my images with Copics so I chose to use Memento (Tuxedo Black) as my stamping ink.
  • With my panel now dry, I arranged my colored images.  I used the stamped sentiment to ground my larger elements.  The little girl is popped up with 3M tape as are the clouds and sunshine  The puppy and duck are adhered with Nuvo by Tonic Deluxe Adhesive 
  • Instead of raindrops I've added rays of sunshine hearts in yellow "sunshine" by PaperSource
  • Little details are subtle:
    • The bluebird on the shoulder 
    • Tiny heart on the puppy's collar
    • Valentine heart in the little girl's hand.
Don't forget those little details for in my humble opinion they take a design to the next level.   A simple card such as this now keeps the viewers eye longer and brings a sigh of delight (I hope) *laughing*   Background colors also play a big part too.  I tried several different colors and mediums before settling on the purple/pink combo (remember your color wheel).


It's my hope to have a dialogue with crafters here on my front porch; so thank you as always for visiting and leaving such lovely comments.  I hope you've enjoyed this sunny little valentine.


The sun will be out tomorrow, but in the meantime let's create something that makes that little bluebird on our shoulder sing!  Until next time.

Very sincerely,
Susie ~
Saturday, January 18, 2020

Hello Bluebird | Storybook Cottage

In the highlands, in the country places,
Where the old plain men have rosy faces,
And the young fair maidens quiet eyes...
~ R L Stevenson

Once upon a time in a village far away sat a little cottage waiting for spring.  With the gales of winter past, tiny blossoms blanket the hillside and new lambs spring to-and fro playing silly lamb games.  Raindrops splash against the window pane and she is reminded March in the highlands can still be cold and damp.  She pulls her cape tighter, preparing for the long journey...

Hello Bluebird Friends!

I'm sharing another sweet storybook card with you today that encompasses some of my favorite friends.   Our scene opens up through a make believe portal to a little cottage in the glen.  I used the sweet Storybook Friends stamp to build a landscape around my sketched cottage on a round panel cut from Fabriano Artistico Hot Press watercolor paper.

Once I sketched and stamped the foundation I laid down a light glaze of watercolor and set it aside. I will go back to it later.   To begin building the scene I like to stamp the elements on masking paper and fussy cut them.  The slightly tacky paper allows me to arrange and rearrange until I am satisfied with placement.   And in this case I did change it up in the end (she smiles).   I didn't use some of the pieces you see here, but wanted you to see the process and how it can aid in building your design.


All the little characters were stamped with Distress Antique Linen ink on the Fabriano Artistico Hot Press watercolor paper.  I prefer hot press for the smooth white appearance.  The difference between hot press and cold press in a nutshell is the surface and texture of the paper.   For this piece I've used several different watercolor mediums.  The cottage scene and landscape is watercolored using Schmincke Horadam pan watercolors, and all the little storybook characters are watercolored with Kuretake Zig Watercolor Brush Pens.   I like to use my pens a little differently by putting some of the watercolor ink on a small clear block and picking up the watercolor from there.   This helps me avoid harsh lines and get closer to that no-line watercolor look.

To ground the scene I cut a little opened book from patterned paper as a visual for the story. Last, I arrange all the characters around the die-cut circle for the final layer.   And, like my other storybook cards I've sprinkled some happy moments in stardust form along the path and around the cottage using Stickles Stardust glitter glue.  All of the characters are adhered along the circle with glue or raised when appropriate with 3M double sided tape for additional dimension.


Those who know me know that I like to add in patterned paper when I can.  I looked through my stash for a small pattern and found this wheat colored lattice pattern - perfect!  I cut a circle one size smaller in the lattice pattern and adhered it over the cottage scene.  Then I placed the circle with our characters over the scene.  The path to our storybook card is complete.


Stamp sets used on this card:


A dainty tea awaits our friends as springtime blossoms in the highlands.  I hope you've enjoyed your visit today and will create your own storybook card to share with us.

Very sincerely,
Susie Lessard ~
Friday, January 10, 2020

Hello Bluebird | Transitioning Stamp sets + Valentine Party

Hello friends,

Happy New Year and welcome to my front porch!   Just a short visit today to share a sweet little Valentine card with you created with some previous released Hello Bluebird Stamp sets.   Using your stamp sets this way is a nice way to continue stamping right after Christmas without straining our budgets.   We usually have our Christmas color palettes still on our desks and with just a few tweaks we can start creating Valentine's Day cards (my favorite).   A friend and fellow designer told me the other day that Valentine cards are her favorite to create (don't tell Christmas!) isn't that cute?  It certainly brought a smile to my face.

I started by jotting down some ideas in my notebook and creating a faux mock-up of the card.   It's a two-fold process for me;

  •  1.  Gets the creative juices flowing and,
  •  2. Allows me to move elements around, and brings the design visually from head to paper which helps my creative process.  


For my card I've used the Hello Bluebird stamp and die set(s) listed below.  All images were colored with Copic markers and patterned paper from my stash.


Transforming the Treehouse Scene and Merry Mice from Christmas to Valentine's Day was simple.  By choosing elements like the dainty pink/red flowered patterned paper, red heart with sparkly arrow, a heart shaped door knob, clouds dotted with hearts for foliage, and valentine letters sealed with sweet pink hearts change the landscape from Christmas to Valentine's Day.   Just add your creativity and imagination.


You're invited to a Valentine Party!

One element I always try to include in my design(s) is the sweet Hello Bluebird icon.  I think it's so lovely and it just melts my heart each and every time I look for that special spot.

I hope you've enjoyed this look at transitioning stamp sets and will give it a try in 2020!

Sincerely,
Susie ~
Tuesday, December 31, 2019

Hello Bluebird | Happy New Year's Eve!


Happy New Year's Eve
from
Your Hello Bluebird Stamp friends!


A slimline card for your enjoyment today.   Colored with Copic markers and arranged with some of our favorite characters from this past year.   All wishing you love and laughter, health and happiness in the coming New Year of 2020!

Thank you for all your support, encouragement and online friendship.  And most of all, thank you for inspiring me with all your beautiful artwork.   I'll see you soon with some sweet Valentine inspiration.

Very sincerely yours,
Susie ~


Sunday, December 29, 2019

Hello Bluebird | Happy New Year

Hello friends and Happy New Year!    Are you ready to ring in a new decade?    Are you reflecting back on the past 10 years?  Or is it enough to wonder where the past year went?!? (she smiles).   This year is going to be a big page turner for me.    I'm as busy now as I was when I worked in the marketplace.   In the past ten years I became a grandmother for the first time, celebrated 50 years of marriage, and made two huge moves! 

Today, I am delighted to share one last card for 2019 with you from Hello Bluebird Stamps.   I wanted this to be subtle, artful, finely woven in black, white, and sliver.   Free from color, but vested in a clean design.   Designing this way isn't always easy - what is the take-away?   For me, it causes me to slow down and think.  It provides a clean canvas for creativity, and a dreaming place for new ideas.


For this card I used both new and old stamp sets.   Happy New Year from the 2018 North Star set, and the die cut tress from the 2018 Frosty Littles, and the 2019 Snowball Fight.   Instead of stamping, I chose a black/white print for the trees.   The greeting is embossed with fine sliver embossing powder on vellum and laid over a panel of soft stone card stock.   This panel is now adhered to a 3.75 x 5 piece of 110 lb weight Neenah Solar White card stock.   The little trees are applied with Tonic liquid adhesive as are the numbers die-cut from silver card stock using the Charlie Numbers die set.

The panel is complete and ready to be placed on top of the final 4.25x5.5 patterned card base with 3M adhesive tape.  While void of color, the patterns, and dimension provide interest.   A few black gems finish the card. 

I thought it might be nice to see what you liked this past year on my IG gallery so I've included my Top Nine cards for one last look.   All but one (the first card) are created with Hello Bluebird Stamps and dies and use different mediums.   From Copic markers, watercolor, and pencil to layered, scene building, and clean and simple you've encouraged me all the way!   Thank you!
My Top Nine Cards for 2019

White Washed Putz Houses with Glitter Roofs
But cards are not all I enjoy creating.  This Christmas I created some some white washed Putz Houses to decorate the inside of my china cabinet.   Back with twinkle lights they add warmth and elegance.

Snowmen and Santa's each with a story take their place in my 3-tired stand.   A vintage snow sled from years gone by and snowman stand at the ready for the fun to be had.
Christmas in Charleston 2019

And from my front porch to yours, thank you.   Thank you for your visits, comments, encouragement, and the inspiration you bring to me.   May 2020 bring you hope, peace, and blessings for your good and God's glory.

Until next time
Sincerely yours,
Susie ~ 
Tuesday, December 17, 2019

Hello Bluebird | Thinking of You with Love...

"I wrote in a song that in the long, long trip of growing, there are stops along the way...
~ Mister Rogers

Hello Bluebird Friends!

Christmas is only eight days away - to a child it must seem like a long, long trip of "are we there yet?"   Today I'm taking a look back through my own childhood stops along the way.

I love red, I do!   And I love Christmas with all that it brings.  But I am especially fond of Valentine's Day.  Valentine baskets, mailboxes, cards to create and color, cookies to bake and decorate -- February colored in pink and red; adorned in chocolate and lace!   Oh I'm in love with love itself!

And, with each and every Valentine card I create I wander down memory lane to second grade.  I drop a card into each doily trimmed basket and look forward to the party about to take place.  Sweets shaped like hearts and little candies that say, "Will you be my Valentine!"  YES!

So today I've created a Valentine's Day card for YOU using the stamps sets and the available companion dies:
I've also used the Stand Alone Die set, Gallery Frame #1 cut from red card stock.


How did I create this card?

I cut an A2 card base (top fold) in 110 lb Neenah Solar White card stock and set it aside.  Then I began stamping the images from the stamp sets listed above in Memento Ink (Tuxedo Black) and set them aside.  I also cut 2 white card stock panels (3.75 x 5.0 inches).   I die cut a heart from one, and ink blended the other with Distress Ink, Spun Sugar and a little Victorian Velvet.  Then I married the two with some adhesive, let it dry, and stamped my sentiment from the Banner Blessings set in VersaFine Ink (Black).  Sometimes I will do a "ghost" mock up that helps me with placement.  I die-cut the companion dies without stamping on them and move them around until I like the placement.

Satisfied with placement, I continue on.   I played with the idea of leaving the heart die-cut panel white, but decide to see what a contrasting color pattern might look like.  Hmm, I like that!


Now the fun begins - coloring!   All stamp images are colored with Copic markers.
  • Mouse = C00, C1;
  • Mailbox and Scarf = R22,24, and 27; E31, 32, 34
  • Bluebird = B00, B01; R00, R01
  • Flowers = B00, 01, 34, 64; R22, 24, 27; Y08
  • Leaves: BG 70, 72, G03
  • White Gel Pen
With all the images colored, I adhered them in place.  The only images raised with 3M adhesive tape are the mouse and bluebird.   I cut a slit in the mailbox opening and tucked one of the envelopes inside and that gives it a little height - enough that I can tuck an extra letter underneath.   The third letter is held by the little mouse.  I like to keep little negatives from dies, i.e., dots, hearts, etc.   They come in so handy for additional ephemera to put on your card.   For this card, thoughts of love using negative dots and hearts drift upward as the little bluebird gazes at the sentiment - Thinking of You with Love!

I hope you've enjoyed my card today.   Wishes for the Merriest of Christmases and a Happy New Year!  Be sure to visit the Hello Bluebird IG and Facebook galleries for new cards and inspiration from the design team.   Until next time ~

Sincerely yours,
Susie ~

Custom Post Signature

Custom Post  Signature